There are lots of web tools out there to help you make fun animated GIFs, Adobe Express and Canva of course come to mind... but my school districts pay for WeVideo subscriptions, and there is SO much that you can do with WeVideo other than making, well... videos!
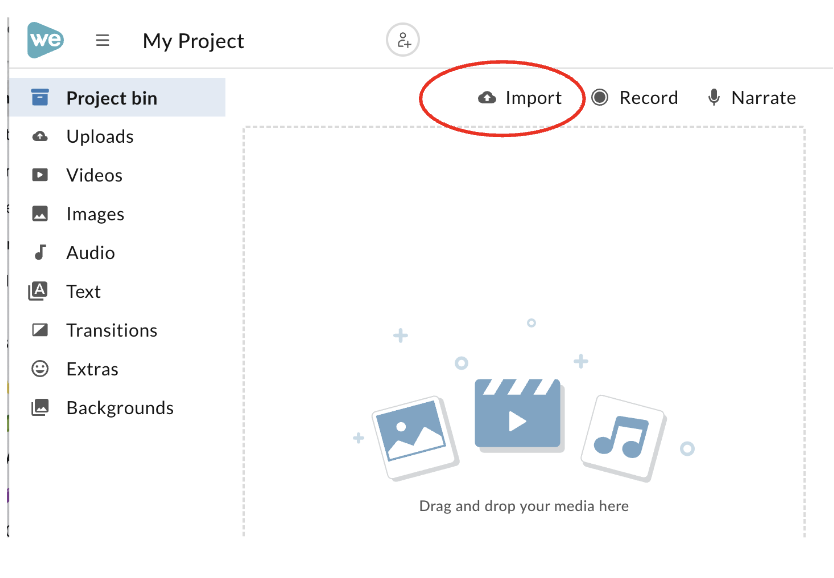
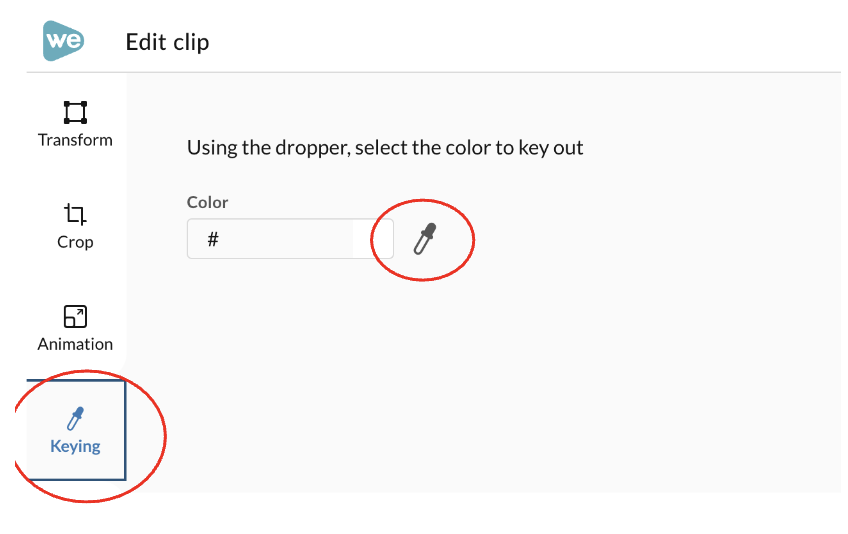
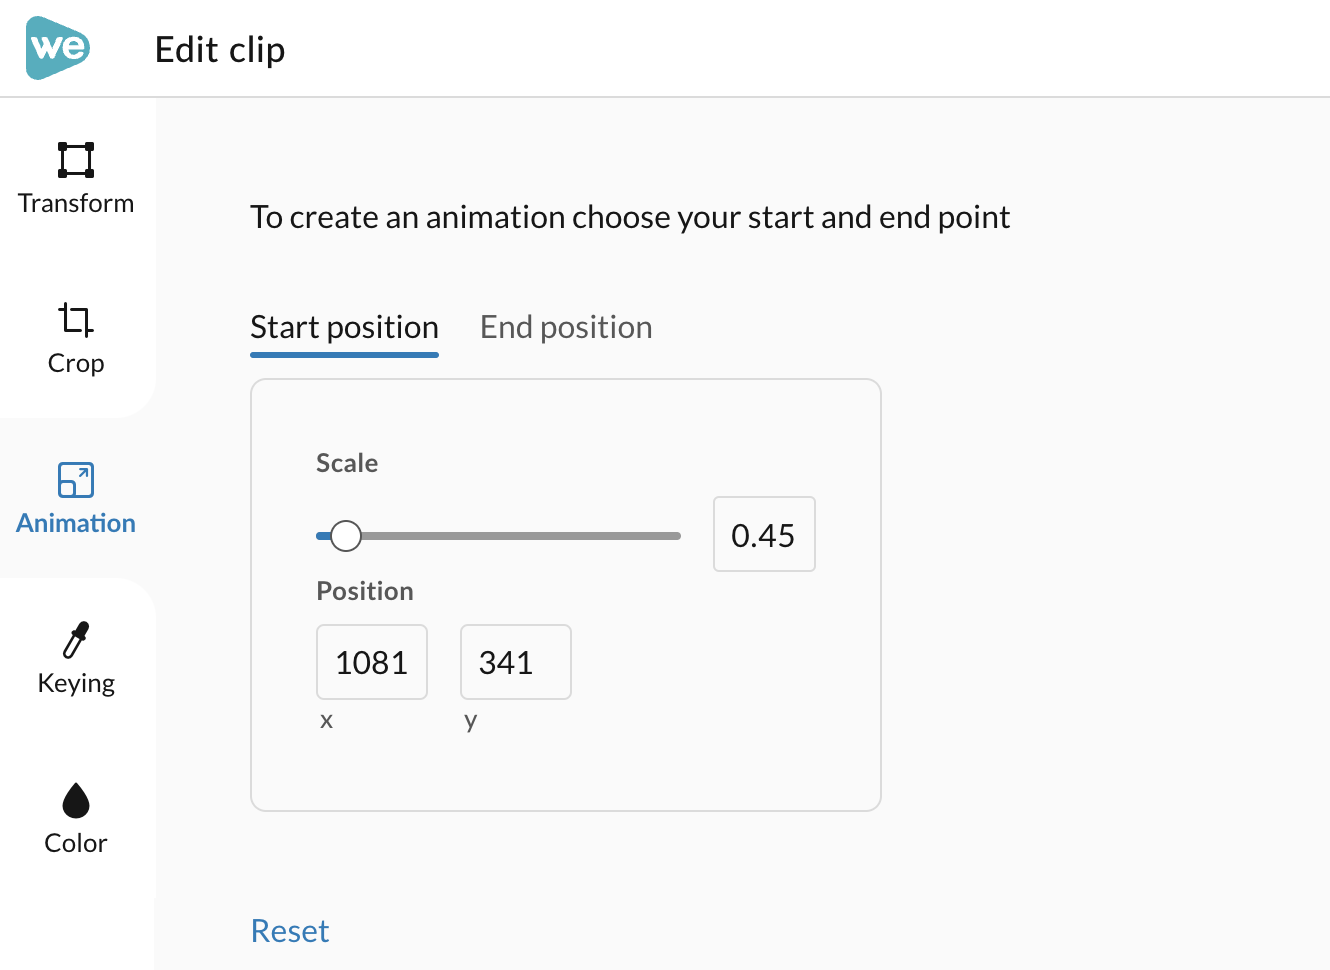
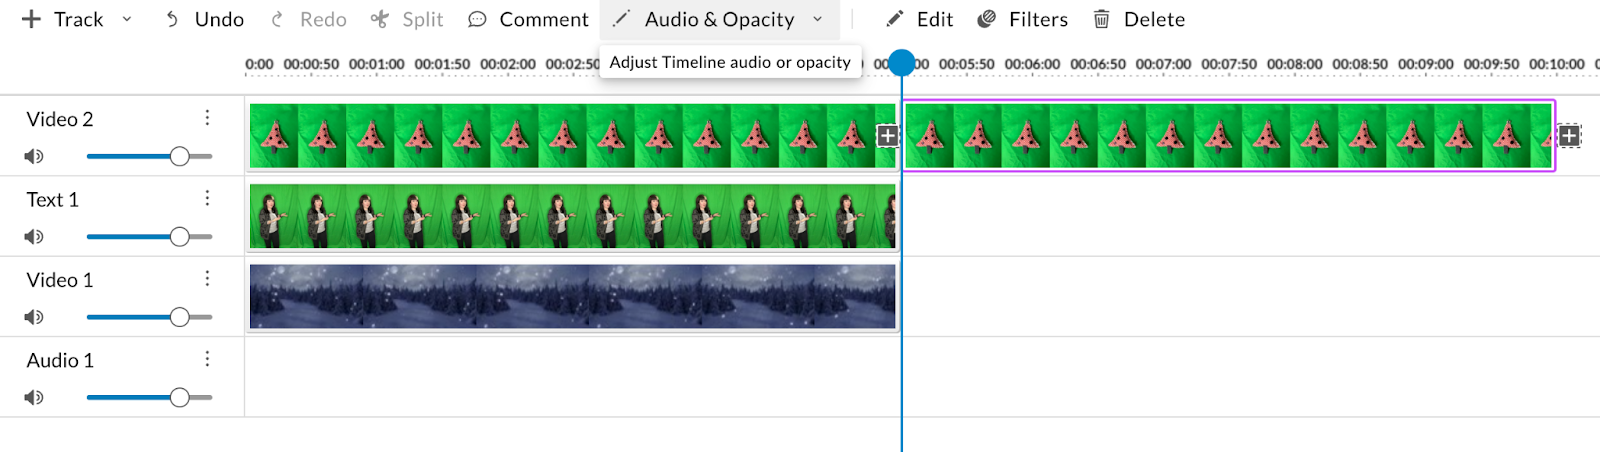
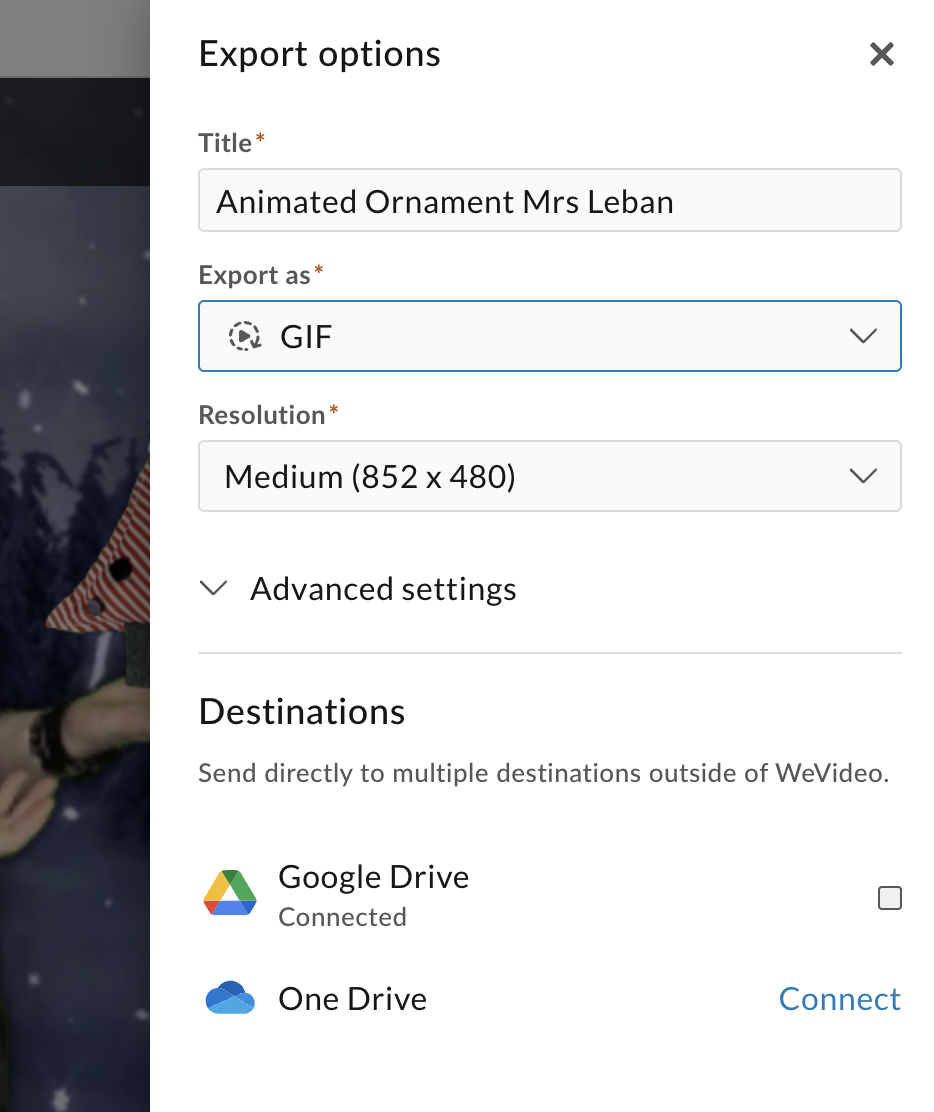
You can save as GIF, create simple animations, or export audio-only files (awesome for podcasting or songwriting!) Below are the steps that I use with 4-5th grade students to animate objects they create in class - this example is a sewing project, but could be easily adapted to other small sculptures, drawings, or paper crafts. Enjoy!
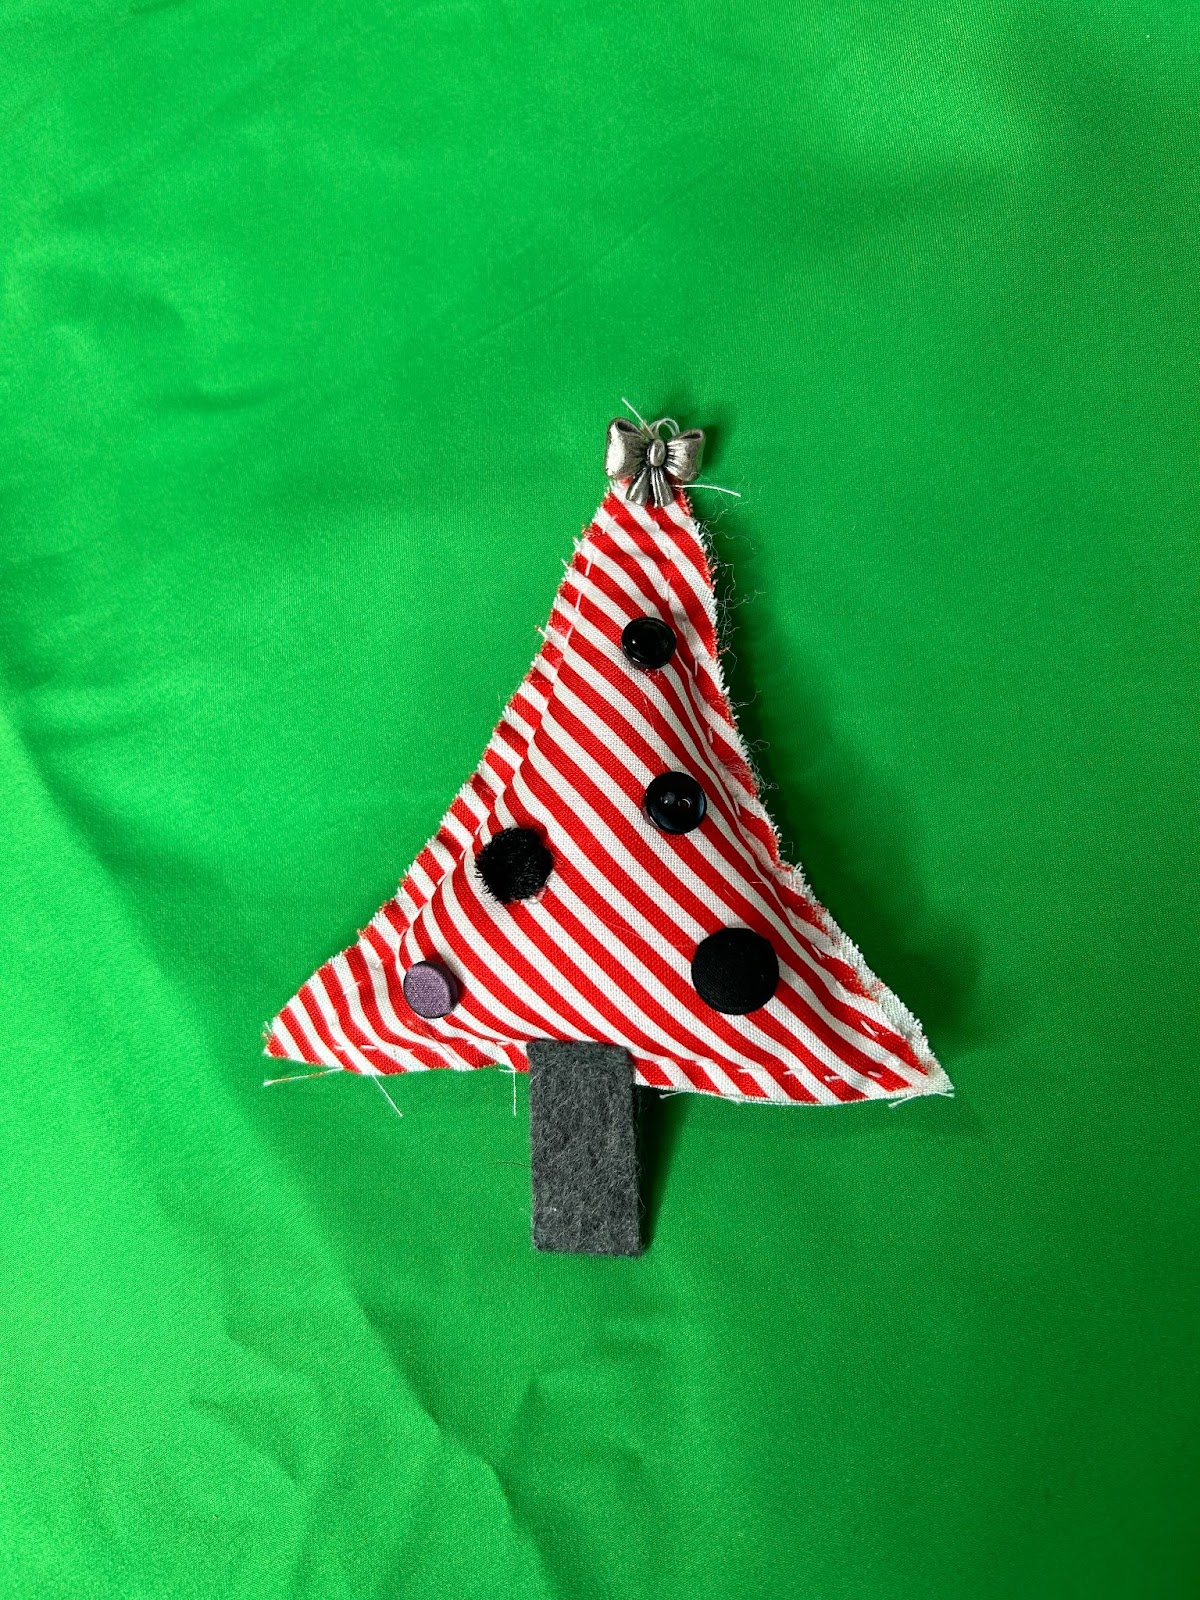
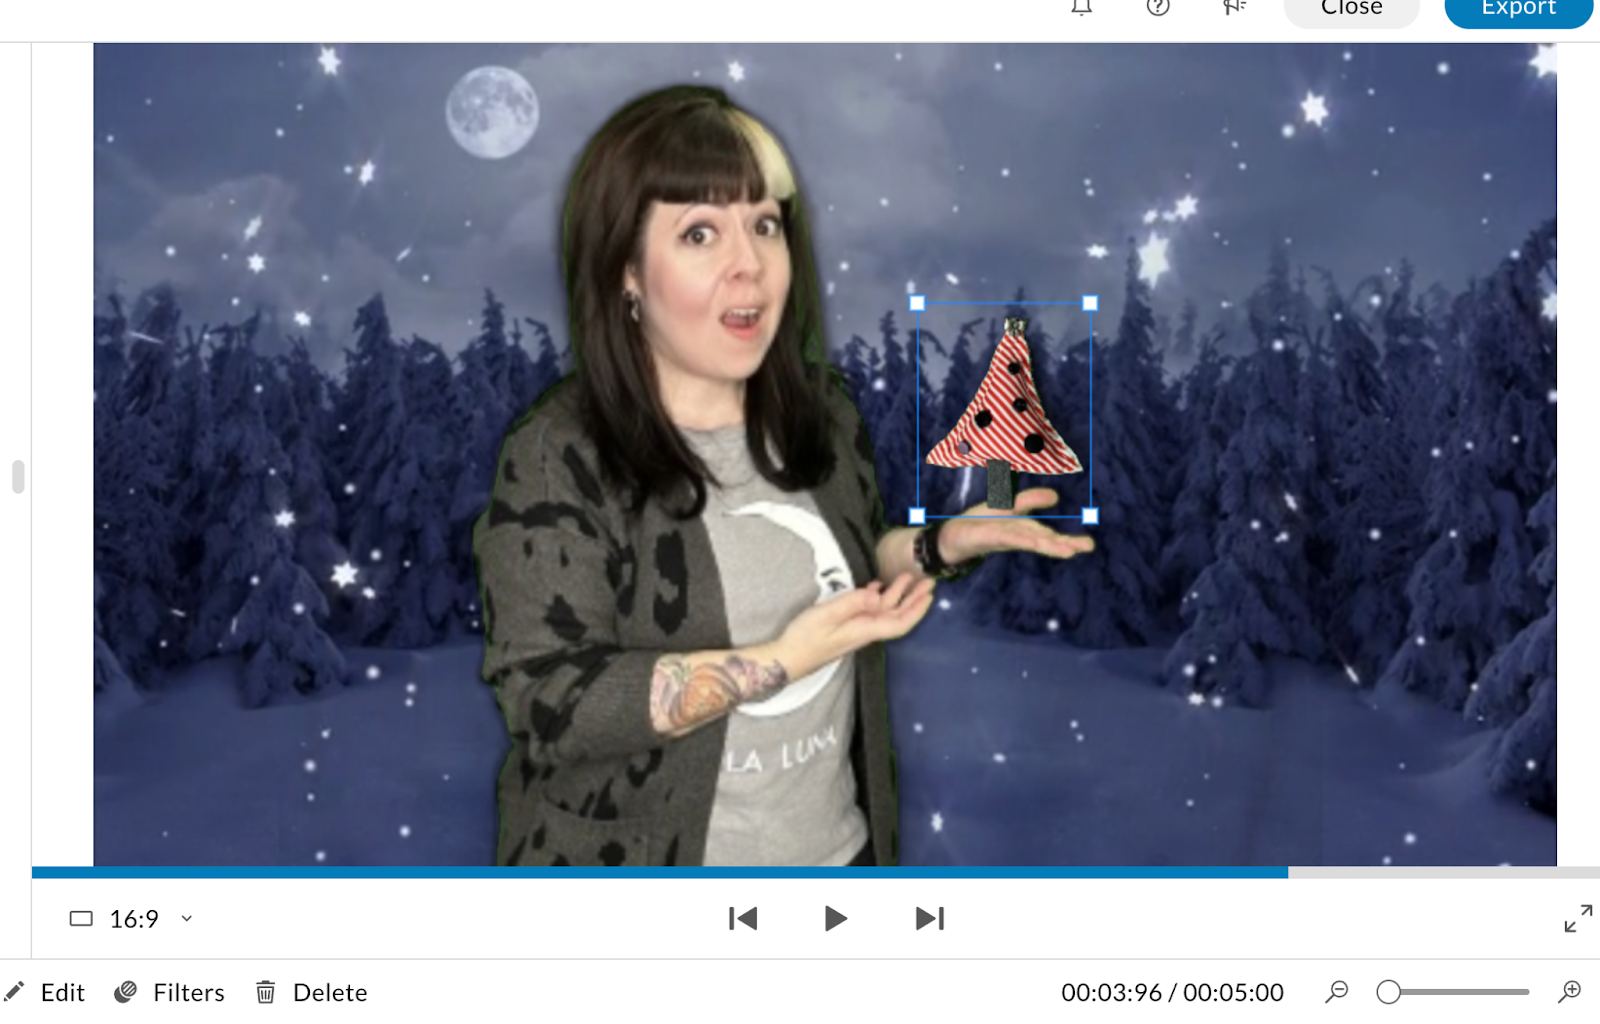
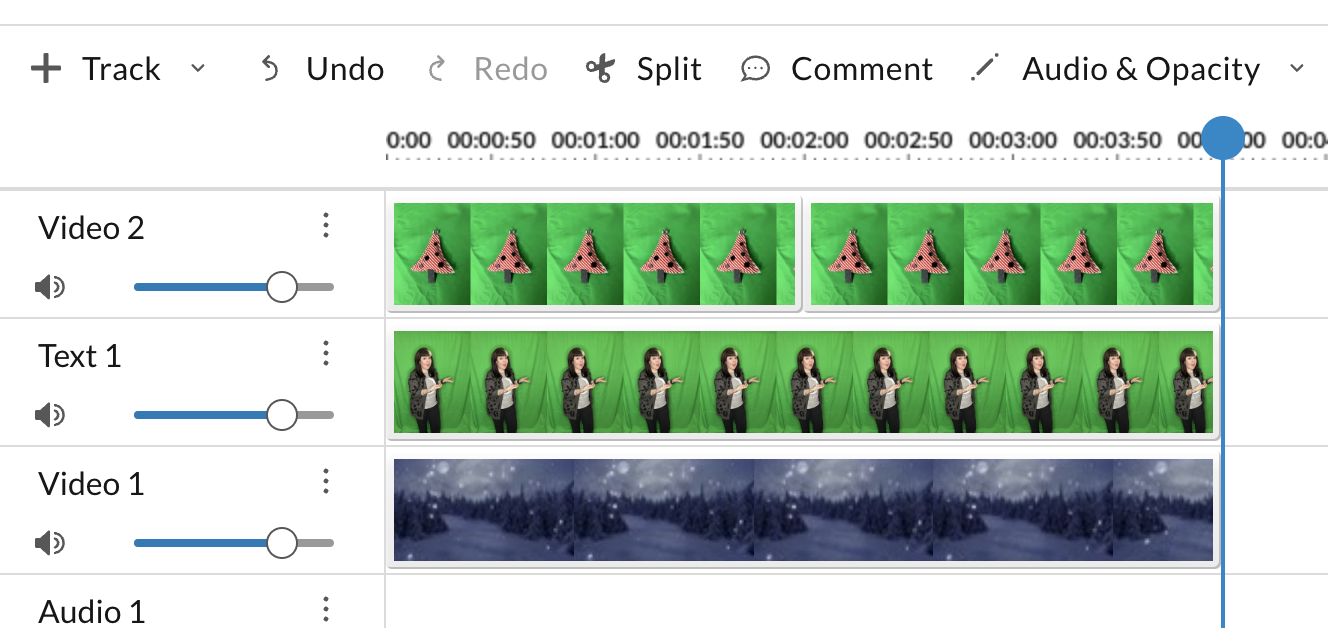
WeVideo Animated GIF Project: Holiday Tree Edition
You will need:
Photo of tree ornament on green backdrop
You will also need:
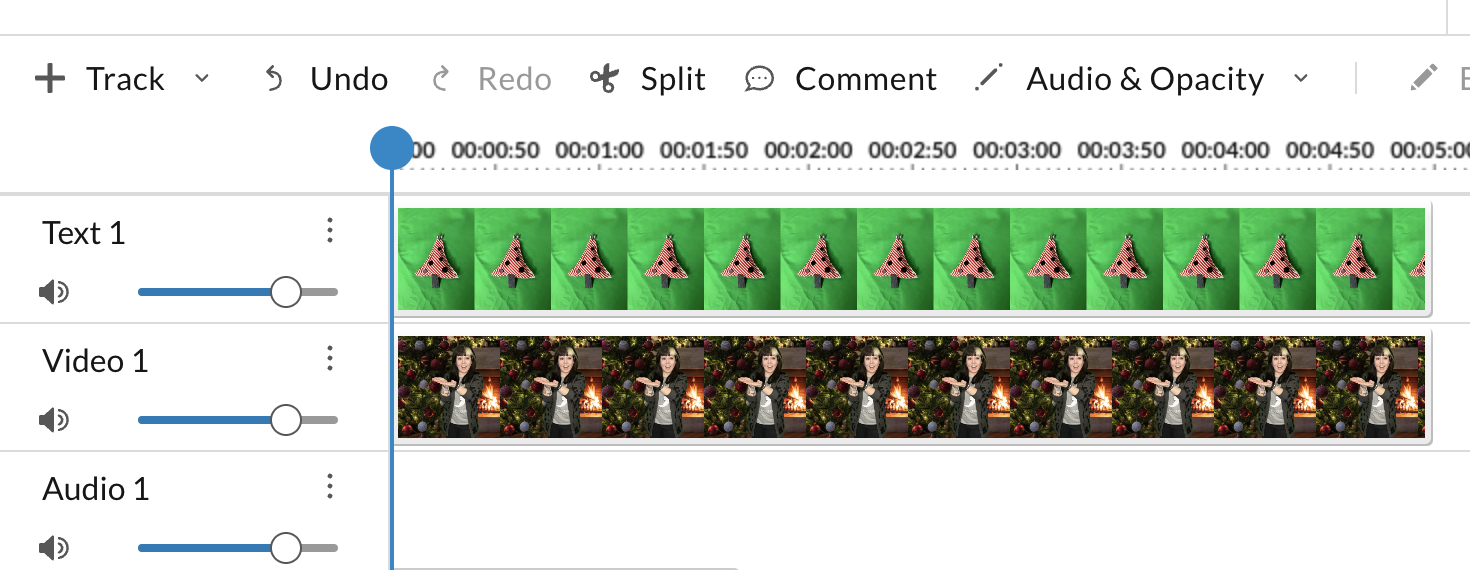
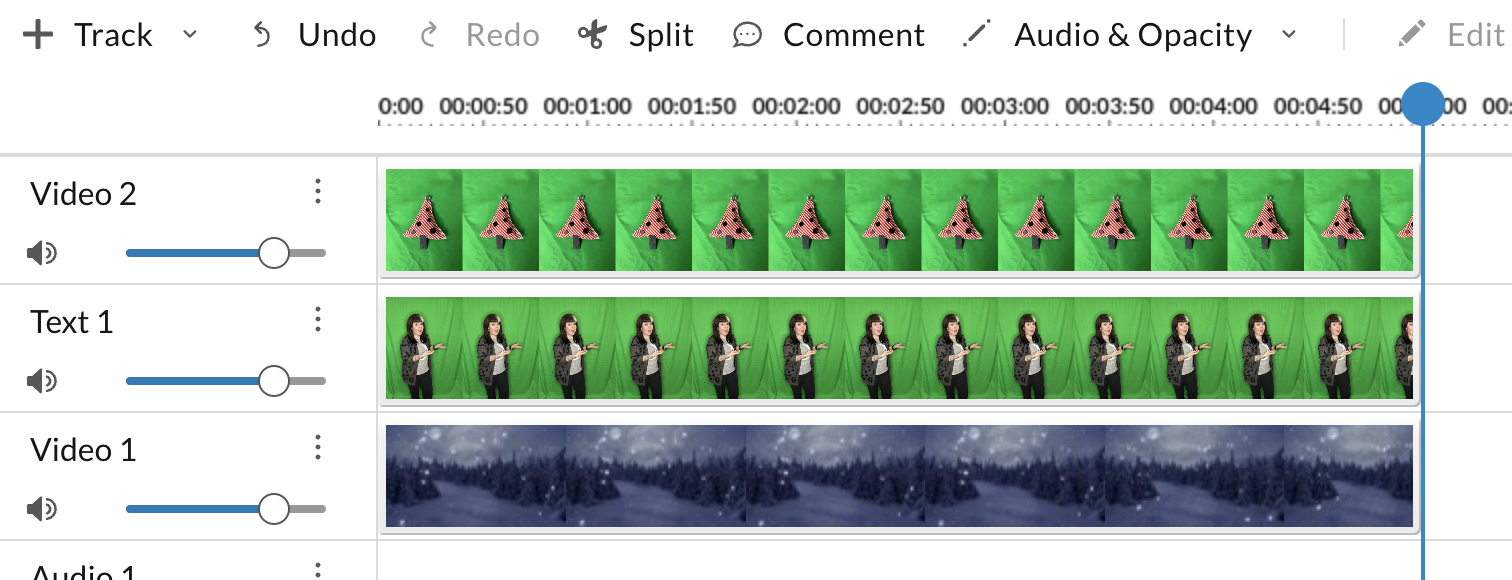
Photo of student/yourself/person on green backdrop, posed to hold or interact with object in some way
OR
Photo of yourself with a festive backdrop (which eliminates the need to remove your own background)
Perhaps your school or department has a Cricut (or Silhouette) cutting machine, or maybe you own one of your own. They're great for making labels, signage, wall decals, or heat press t-shirt designs... but have you thought about how you might use this tool with an entire classroom of students? I've done it, and I'm going to share my workflow with you so that you can do it, too.
To start with, I do NOT have students create accounts in or use the Cricut Design Space software. Due to IL SOPPA law concerns, I find it easier to just avoid having students create accounts anywhere it isn't absolutely necessary.
Instead, I have students design their projects using the free Google Workspace tools that we already know and love! My favorite way to do this is to create a template for students in Google Slides. I set the slides to whatever size we need for our final designs to be (File --> Page Setup --> Custom), and - did you know - you can even set the background of your slide to be transparent (Background --> Color --> Transparent)?!
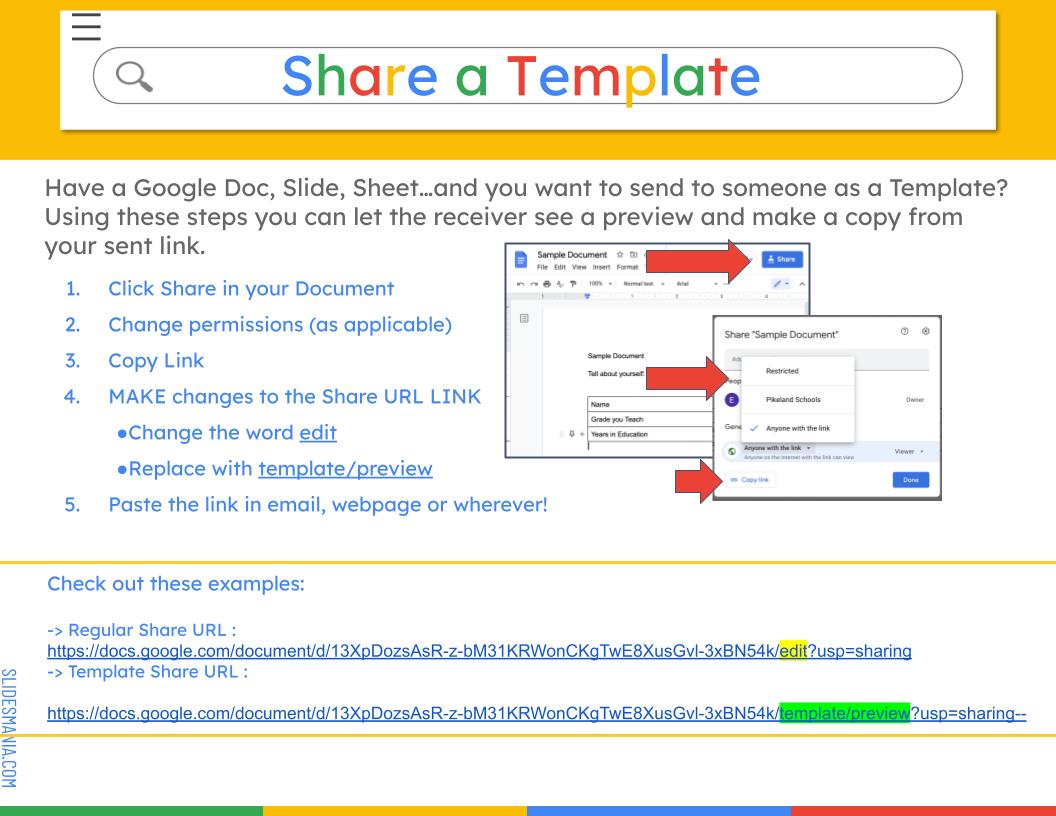
Once you have a slide set up for students to work on, you can share a modified URL with them - by just changing the URL in a Google Doc/Slide/Sheet...you can share as a preview & template! Here are the details, courtesy of my friend and colleague Emily Pool (@EPool01 on Twitter).
What will you have your students design? In the past, we've made decals with our names to put on our Chromebooks, personal crest designs, and daily affirmations (heat-pressed onto zipper pouches). Every time I complete a project, I think of a whole bunch more I'd like to do after that!
Here's an example of a template that I used with students as a starter project: a simple name design decal utilizing word art + a symbol, shape, or graphic to represent each student's personality. (Please note: the first slide is blank because this is where students will create their own designs.) - Feel free to make a copy of this template and/or customize it for your own use!
Once a student creates their design in Google Slides, they will need to save their slide as a .jpg or .png file, and submit it to the teacher (Canvas, Google Classroom, a shared Drive folder, email, etc...) This can be done from within Google Slides by going to File --> Download --> PNG Image (or JPEG image) - I prefer the PNG image file format because it retains a transparent background and makes my job easier in the next step!
NOW, you as the teacher/facilitator will need to import these designs into Cricut Design Space and cut them out. That means you'll need to download the Cricut Design Space software and create a free account for yourself.
I made a short video that explains how I import .jpg and .png files into Cricut Design Space and get them ready to cut:
I like to cut out student projects during class, preferably while they're working on another activity at their seats so that I can work with them in small groups of 2-3. They can watch the machine cut out their design, and then I have students weed their own design to remove all of the material in the negative space. I like to tell them to start with the background of the decal first. Remove all of the background, and then it should be more clear to them what other pieces (if any) need to be removed.
I also allow students to apply their own decals using transfer tape. I generally do one demo of how this is done, and then they go off on their own! Sometimes working with a partner can be helpful here. It just depends on the size of your class.
Our Chromebook name labels turned out pretty cute, actually, and they're super functional:
You could have students create .jpg images using any graphic design tool that you have access to at your school, such as Adobe Express or Canva, too. I like using Google tools because the skills they learn are transferrable to other projects/slide presentations using Google in the future.
I also love that this workflow only requires ONE Cricut cutting machine at a time. If you have access to additional machines, it would make the cutting step move more quickly, but you would probably need another adult with a Design Space account to connect to the other machine and cut along side you.
Lastly, the vinyl we used for these Chromebook decals are made of REMOVABLE matte vinyl, which received the "blessing" of the tech department prior to our project's inception! So you might want to get that cleared as well if you're doing the Chromebook sticker thing.
Have you used Cricut in the classroom to do a project with students? Please share with me, or tag me in your projects on Twitter, @MrsLeban!
I’ve noticed that several accounts I follow on Instagram use tools like Linktr.ee to create these mobile-friendly landing pages with links to other relevant personal sites, shops, social media profiles, and YouTube channels. Linktree solves the problem of having limited hyperlinks in a bio by having one link that takes a viewer to any/all other relevant links.
So, I was thinking about making a Linktree account of my own, and started researching what’s out there. Most of these tools are “freemium,” which means that you can use the service with limited functionality for free, but if you want to use certain features (like advanced customization and removing branding) you’ll have to pay. Monthly. If it was a one-time thing, I may have actually considered it, but I already have too many monthly subscriptions, with services like Netflix, Hulu, Disney +, Paramount +, WOW Network, HBO Max, and Google storage plans... Oof.
I devised a way to create an incredibly similar type of page - fully customizable - but without some of the fancy analytics and tracking, which I honestly don’t need, using Google Slides! Here’s how I made it happen:
First, I opened a new Google Slides file, and set the “Page Setup” size to 9”x16” - this creates a vertical slide that is good for viewing on most mobile devices.
I found an image that I liked to set as a background. You can use a number of free stock photo websites for this, like Pixabay, Unsplash, or Pexels. You can also use a tool like Canva to create an interesting background graphic or pattern yourself and then download it.
Then, I used Flaticon (You can also use a site like the Noun Project) to find some social media icons that I can link out to my associated social media channels.
I also inserted a profile pic and my name (I like to use “Insert-Word Art” to do this because I have greater control over the size and placement.)
I then used the “Insert Shape” tool and chose a rounded rectangle shape and filled it with a color that complimented my design. If you’re having trouble choosing colors, or want suggestions, try a site like Coolors to find some great color palette suggestions.
The trick to getting your linked buttons all even and symmetrical is to create ONE button just how you like it, then copy/paste it to create additional buttons the same size. If you select all of your shapes at once, you can line them up perfectly by using “Arrange - Align - Center” command. “Arrange - Distribute - Vertically” will take your shapes and spread them out evenly with the same spacing! Try it out, it’s amazing! You can have as many or as few buttons as you want because it's YOUR custom page!
If you haven’t already, double-click on the button shapes to add text, indicating where the button will link out to. I have a number of different websites, so I had one that went to my professional development site, and one that went to the book I illustrated, among other things. Then, link the shapes to the corresponding sites.
At the very bottom of my page, I added attribution for my icons via Flaticon. Be sure to do that if you use those sites!
NOW… You will PUBLISH your slide to the web by going to “File - Publish to the Web” and click the yellow “Publish” button. I don't even mess with any of the other settings. Just copy the published URL!
Go to a URL shortener (I use bit.ly) and paste your URL to create a shortened/custom address. I chose bit.ly/LebanLinks for mine!
Your bit.ly URL can now be used in your bios on websites like Instagram and Twitter, so that if someone checks your bio, they’ll now have access to ALL of your relevant links! Be sure to test all of your links out first before sharing it with the world.
I’m so proud of my custom landing page! It cost me ZERO dollars to make, no recurring subscription fees, and it’s 100% my own custom design. And because it was made with Google Slides, I can go back in and change/update it at any time and it automatically syncs - no editing of links in bio necessary. #Winning!
Hey all, long time no see. Like many of you, I've been really overwhelmed with... everything. We don't need to go into it. But I'm finally feeling a little more inspired lately to create new things and have more fun. Well, slowly but surely. It comes and goes in waves. I think you know the feeling.
In any case, I'd like to share something fun I've been working on, inspired by a mini-assignment in my Google Certified Coach cohort through the Illinois Digital Educators Alliance (aka IDEA). We were tasked with creating a Google Slide to introduce ourselves, and it dawned on me how useful this could be for things like Twitter chats or email signatures as a sort of digital version of your business card... I mean, it's not like I've been giving away too many of my paper ones lately... !!!
This is pretty simple and fun to do... just lay out your design on a Google Slide by inserting a pic (or Bitmoji), your contact info/social links, any pertinent badges, logos, or professional affiliations... and then File -> download as -> your preferred image file type!
PRO TIP: I like to use Insert -> Word Art for my name, as it gives me greater control over the color, outline, and sizing.
Now, if you really wanna level up your game, you could save this slide as a .pdf so that any/all links are functional - making your digital business card a landing page out to all of your other related work and contact channels! My friend Beth did this on hers and it was pretty dang impressive.
Yet ANOTHER option would be to add and save your final digital business card as a .gif! Then you could add a fun animation or other attention-grabbing element to your design.
So, this assignment got me thinking about other opportunities to represent yourself visually... I decided to try out something similar with my Twitter banner/header. My goal was to create a visual resume of sorts, highlighting the things I would typically include in a written resume:
I was thinking, if someone had no idea who I was, and they were to click on my profile, what would my profile say about me? Twitter bios are quite limiting in size, so how could I get a whole bunch of info out there quickly? Using my iPad and my favorite app, Procreate, I created this collage of images:
You could create something just like this using free tools, like Google Slides/Draw, too!
My previous banner was our group photo from the Google Innovator cohort, so it was important to me to keep that as a prominent item, but I wanted to add information about being a presenter and PD provider, too. So, I added a series of pics of me highlighting these experiences, along with a photo from the Illinois State Teacher of the Year banquet where all of the finalists got to meet the Governor. I then layered ambassador badges, credentials, and other professional affiliations related to the pictured roles near each photo. I even snuck in the Coding to Kindness book cover on the screen of the last photo!
I've been thinking a lot about re-designing my digital presence lately... this is just a start. I also am playing around with a new blog header, and possibly re-vamping some YouTube channel art and things like that.
Do you get the urge to re-design your profiles and webpages every so often? Got any tips or tricks on what's worked for you?
One of my favorite, most relaxing things to do right now is to draw. If I can combine this habit with doing something productive, then so be it. One of the things that I spent some time on is a social media calendar for school libraries.
If you have an Instagram account for yourself or for your school library, this un-dated calendar is full of ideas and prompts for posts throughout the course of an entire month! You could follow each day as listed, or pick and choose items as they are relevant to your situation. My thought was that if you have a rotating calendar of prompts, you can schedule posts ahead of time, or create content in bulk so that it's ready to go later on.
Maybe you're lucky enough to have a volunteer or assistant that can help you run your school library account? Or, maybe your school has a social media club? This calendar would be a great way to give some structure or direction to someone else so that they can help out!
Click the image above to access a printable .PDF version of this school library social media calendar for FREE!
One of my favorite things to do is draw on my iPad. It actually helps me to relax! In fact, I did all of the book illustrations for Coding to Kindness on my iPad using the Procreate app.
Some projects, like the book, are big projects that I work on over time. Other projects, like these Zoom signs, are something that I do out of necessity for myself... and then I realize how helpful they could potentially be for others, so I like to share!
It started out as a set of signs that I would print out for myself to use for my remote students (currently, I'm expected to teach both remote and in-person/hybrid students at the same time).
Full disclosure: this current situation is an unsustainable logistical nightmare. I've never felt like a worse teacher than I do this year. But teachers keep plugging forward, doing the best that we can with what we're given, and this idea is just one of them.
It later occurred to me that a set of signs would also be a great tools for students! I can't even tell you how many times I've had students sit patiently with their hands up, and when I call on them, they ask, "May I use the bathroom?"
...Aargh! You've been waiting that whole time? This is just one of the differences between elementary and middle school students. Middle school students don't wait. They'd just go. But those elementary students, they're so polite! If only my littles had a sign they could just hold up to silently alert me before ducking out for a minute, they could avoid waiting that whole awkward time!
Is this the kind of thing that would help YOU out, too? If so, here's my entire folder of images - download them all, or just whatever you need! You can print them in color and cut them out into circles, or keep it simple by doing a quick black and white/photocopy printout, and square them off using a paper cutter. For the full treatment, print these out on card stock and laminate before gluing onto sticks.
Keep a set for yourself, or create an entire class set to distribute and send home to students! And be sure to share share share with any other educators that you think might find this useful!
Is there a sign that you wish existed, but isn't here? Send me a message via IG or Twitter, and I'll see what I can do! ☺️
As of right now, I won't get to teach from home. It's infuriating. I have asthma and ulcerative colitis, which is a chronic condition that comes and goes. I hadn't had a flare up since 2014. But it's here with full force presently, thanks to the stress I've been under regarding returning to school. Awesome.
Anyways, here's a blog post I've been meaning to write for those of you who ARE lucky enough to teach from home this fall. I have a really great work-from-home setup that does video conferencing and meetings pretty darn nicely, so I figured I'd share what works for me. I even have a whole pdf file with clickable links available HERE with complete details and recommended items.
One of the items that I STRONGLY recommend (if you do nothing else!) is to get a second monitor. You can purchase one on Amazon relatively inexpensively, around $100, or you can use an iPad or other tablet you may have... or even an old computer/laptop? I've even seen teachers use tvs from their house to use as a second screen - so get creative!
DON'T BE A SILHOUETTE
Next on my working-from-home list is lighting. It's a pet peeve of mine when people sit in front of a window. Like, their backdrop is a window. And I'm talking to a backlit silhouette. Aargh! This is simple (and free!) to fix. Just turn around. Face the window and the natural light, it will illuminate you beautifully! I know sometimes your layout may not permit this, so you can also invest in a simple light setup for your space, starting with a desk lamp for behind your computer that helps illuminate your face. You can get all fancy with a YouTuber-style ring light, or even invest in a videoconferencing light like Lume Cube sells. I do have one of these, and they're pretty cool.
BUELLER? BUELLER?
If your microphone on your computer is not-so-great, it's easy to hook up an external mic. Just figure out what your computer input is: USB? Bluetooth? 1/8" (headphone) jack? and decide how much you want to spend! You may not have even realized it, but your earbuds with the built-in microphone are actually really good! Just this last week I decided to really treat myself with a back-to school gift of some sweet black Pixel Buds. #fancy.
Have you noticed increased eyestrain and headaches from starting at a screen for so long? You might want to try some blue light glasses. I gotta admit, I really just love the fashion statement of glasses, so I searched out some funky cat-eye styles on Amazon. For $10-20 you can grab a pair (or switch up your wardrobe with multiples!) and see what you think. Some people swear by them, and others claim to not notice any difference. I have noticed less eye strain when I've got mine on. Even if it's a placebo effect, I'll take it. And they're cute. :)
SHE'S CRAFTY
I've seen a bunch of awesome ideas for setting up your mobile phone or iPad as a doc cam for filming demonstrations, drawing, writing, or books. My fave is to use a locker shelf! (Face it, kids are always throwing these things out at the end of the year - harvest them up for free when you can!) Of course, you can always splurge on a gooseneck-style holder from Amazon for around $25-30 bucks, so it depends on how much effort you want to put into it.
GFB FACTOR
Lastly, do not underestimate the power of a comfortable desk chair! I splurged on a cushy upholstered velvety swivel one in the spring, and I haven't regretted it once! My old desk chair was molded plastic, and I had no idea how uncomfortable that could be until I had to sit in it for hours on end last spring. Eek! (NOT Good For Butts, as my husband would say re: his made-up scale for measuring chair effectiveness.)
Do you want to see more of my home office setup? I actually did a whole Reset EDU video on this topic, and you can watch it here: