Showing posts with label makerspace. Show all posts

Thursday, November 10, 2022

WORKFLOW: How I Organize Cricut Projects with Students

Title Image: Workflow: How I use Cricut for Whole-Class Projects

Perhaps your school or department has a Cricut (or Silhouette) cutting machine, or maybe you own one of your own. They're great for making labels, signage, wall decals, or heat press t-shirt designs... but have you thought about how you might use this tool with an entire classroom of students? I've done it, and I'm going to share my workflow with you so that you can do it, too.

To start with, I do NOT have students create accounts in or use the Cricut Design Space software. Due to IL SOPPA law concerns, I find it easier to just avoid having students create accounts anywhere it isn't absolutely necessary. 

Instead, I have students design their projects using the free Google Workspace tools that we already know and love! My favorite way to do this is to create a template for students in Google Slides. I set the slides to whatever size we need for our final designs to be (File --> Page Setup --> Custom), and - did you know - you can even set the background of your slide to be transparent (Background --> Color --> Transparent)?!

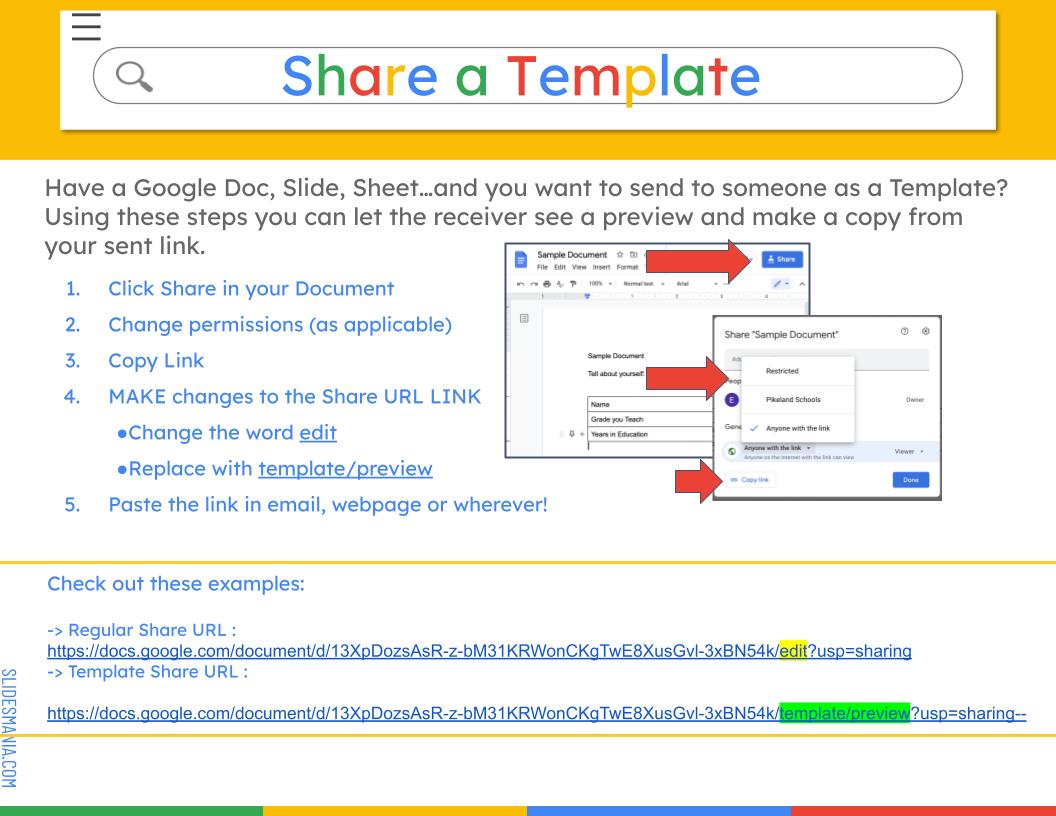
Once you have a slide set up for students to work on, you can share a modified URL with them - by just changing the URL in a Google Doc/Slide/Sheet...you can share as a preview & template! Here are the details, courtesy of my friend and colleague Emily Pool (@EPool01 on Twitter).


What will you have your students design? In the past, we've made decals with our names to put on our Chromebooks, personal crest designs, and daily affirmations (heat-pressed onto zipper pouches). Every time I complete a project, I think of a whole bunch more I'd like to do after that!

Here's an example of a template that I used with students as a starter project: a simple name design decal utilizing word art + a symbol, shape, or graphic to represent each student's personality. (Please note: the first slide is blank because this is where students will create their own designs.) - Feel free to make a copy of this template and/or customize it for your own use! 


Once a student creates their design in Google Slides, they will need to save their slide as a .jpg or .png file, and submit it to the teacher (Canvas, Google Classroom, a shared Drive folder, email, etc...) This can be done from within Google Slides by going to File --> Download --> PNG Image (or JPEG image) - I prefer the PNG image file format because it retains a transparent background and makes my job easier in the next step!

NOW, you as the teacher/facilitator will need to import these designs into Cricut Design Space and cut them out. That means you'll need to download the Cricut Design Space software and create a free account for yourself. 

I made a short video that explains how I import .jpg and .png files into Cricut Design Space and get them ready to cut:


I like to cut out student projects during class, preferably while they're working on another activity at their seats so that I can work with them in small groups of 2-3. They can watch the machine cut out their design, and then I have students weed their own design to remove all of the material in the negative space. I like to tell them to start with the background of the decal first. Remove all of the background, and then it should be more clear to them what other pieces (if any) need to be removed. 

I also allow students to apply their own decals using transfer tape. I generally do one demo of how this is done, and then they go off on their own! Sometimes working with a partner can be helpful here. It just depends on the size of your class. 

Our Chromebook name labels turned out pretty cute, actually, and they're super functional:


You could have students create .jpg images using any graphic design tool that you have access to at your school, such as Adobe Express or Canva, too. I like using Google tools because the skills they learn are transferrable to other projects/slide presentations using Google in the future. 

I also love that this workflow only requires ONE Cricut cutting machine at a time. If you have access to additional machines, it would make the cutting step move more quickly, but you would probably need another adult with a Design Space account to connect to the other machine and cut along side you. 

Lastly, the vinyl we used for these Chromebook decals are made of REMOVABLE matte vinyl, which received the "blessing" of the tech department prior to our project's inception! So you might want to get that cleared as well if you're doing the Chromebook sticker thing. 

Have you used Cricut in the classroom to do a project with students? Please share with me, or tag me in your projects on Twitter, @MrsLeban

- Jen

Jen Leban, Instructional Technology Coach bit.ly/LebanLinks


Tuesday, February 21, 2017

Hosting a Cardboard Challenge at Your School


I remember watching Caine's Arcade years ago when I was still teaching art, and immediately becoming inspired and wanting to do something like that with my students, but it never quite came to fruition...

Then, just this fall, I was listening to the TechEducator Podcast about #CardboardEDU and it all came back to me - I remembered how cool I thought the idea of creating using ordinary cardboard material was, and began to brainstorm all over again about how I could use this at my school. Despite being a technology teacher, I absolutely loved the low-tech aspect, and how easy it would be to create a maker-themed event for it.

A quick Google search turned up all sorts of events and projects at schools all over, like the Global Cardboard Challenge, which has been happening since 2012 ... which left me feeling quite tardy to the party! But I still needed to make this happen. I presented the idea to Mr Walker, our art teacher, and we decided to make it a joint effort. We then went to my principal, who was super supportive, and scheduled a short presentation for us at the next PTA meeting, so that we could present to parents and get some support (and supplies!) from their group, too!


The "official" Global Cardboard Challenge is held in October each year, but since the art teacher and I weren't really sure how this would go over, we decided to go ahead and host it in February (at the time, giving us a few months to sort out the details) because it is a relatively less busy time of the year in our building, making it more ideal for hosting events.


In theory, hosting a cardboard challenge event is pretty simple: collect a bunch of cardboard, find a chunk of time, and have students come and make stuff. But of course, in reality, it helps to be a little more organized than that. Here's what we did:
  1. Write a list of supplies to buy, and ask PTA to help fund: cardboard scissors, saws, tape, and glue gun sticks. 
  2. Ask PTA for parent supervision help (if needed, we found that this wasn't needed as much as we originally thought). 
  3. Pick a date (we chose 3:30-6 pm after school on a Thursday), and reserve a space in your building - we chose the cafeteria for the big tables and sweep-able linoleum floors. 
  4. Advertise! We made flyers and asked each teacher to post one in their classroom or on their door. We also went on our morning announcements to try and hype the event. 
  5. Collect cardboard. Lots of it. Have a space to store it all ahead of time. We used the art room, a storage closet, and even a section of basement hallway. Our maintenance team was super supportive (and patient!) with us. Sources for cardboard included parents, teachers, students, maintenance department, cafeteria team... everyone pitched in and it was awesome!
  6. Create a student sign-up system for the event. We used a Google Form to have students sign up in teams of up to four. We asked them to come up with a team name, and encouraged matching shirts, costumes, or accessories. Having students sign up ahead of time was helpful so that we could estimate how much we needed for supplies. 
  7. Decide if your event is going to have a theme, and if not, consider giving some ideas to students for projects: cardboard forts? armor? robots? games? vehicles? sculpture? costumes? We kept our first year open-ended, but I'm considering having a theme next year. 
  8. Awards. Will you have them? For what categories? Who votes? For our first year, we made simple participation medals (out of cardboard, of course) that read: "I mastered the Cardboard Challenge at SMS," and encouraged students to wear them to school the following day.

I was so excited to have over 15 teams of students sign up for our first ever Cardboard Challenge event! There was so much excitement in the cafeteria. Our administrators stopped by several times to watch the action unfold, and many teachers took the time to stop by and talk to students, too! We even had a team of seniors from the York High School "Invite to Teach" program (it's like a teacher internship for students who think they'll go into the education field in college) participate in the challenge!


For leaving the first year's event open-ended, we got some pretty fun and creative results: two massive castle forts, a life-sized robot, a working skateboard, a cardboard V-8 engine, a basketball hoop, a cityscape, and some cardboard shields and weapons were among the finished products!


I think that the students really enjoyed themselves. Several groups took their finished pieces home; a few others left their creations here at school and are on display throughout the building. One of the nicest things to happen after the event was this super sweet and cute email that I received from a student:

I've literally NEVER had a student take time like that to write me an email just to say that they liked something. So this is a pretty big deal for me. I'm saving it in the happy file.


Reflecting on the night's events, there are a few things that I would improve upon for next year:
  1. I need a better clean up system. There was a huge mess at the end of the night. It would be nice to give each team their own waste bin to toss trash as they work. Also, I should pre-set some large cardboard boxes as recycling "bins" for unused larger pieces of cardboard to be returned. 
  2. An adult sponsor for each team. I'm considering having each team include an adult sponsor, like a parent or teacher, to help with building and supervision. It would be a great way to include parents (or building staff), and also help with my #1 item - cleanup. 
  3. Have a snack/refreshment station. Even just cups for water would be nice, but some cookies or granola bars at a table just beyond the builders would be a good place to take breaks a couple of times during the evening. 
  4. Supply organization and safety. Thankfully, everyone was safe and no one was injured beyond a paper, er, cardboard cut, but I would like to feel just a tad bit more organized by having a pre-set "toolbox" for each group next time, probably consisting of cardboard scissors, exact-o knife, glue sticks, tape, cutting mat, etc... This is also where having an adult sponsor for each team would come in especially handy, too. 
  5. Size limits, and plans for display after the event. Giant forts are cool, but don't always fit through the doorway, nor are there a lot of places to store/display them. I think I need to put a cap on size, unless a student plans on taking it with them!
  6. Trophies and a closing ceremony. Our event just kind of ended with a mad scramble to clean up and get out on time. It would have been nice to have more of a show-and-tell time, or awards ceremony. I'd love to make super cute cardboard "trophies" for the winners, too. 

Have you ever been to an event like this, or hosted one yourself? Do you have any advice or ideas? Let me know!

- Mrs L.

Thursday, November 3, 2016

Using Ozobots in the Middle School Classroom


The middle school tech teachers in my district have tried really hard in the last two years to modernize the curriculum and engage students. One of the ways that we do this is through tech tools and gadgets, which we refer to as "Innovation Stations."

8th grade (a nine-week course) uses Spheros, Makey Makey, and LittleBits, 6th grade (a six-week course) uses Dot and Dash robots, and 7th grade (also a six-week course) uses Ozobots. So each grade gets to have an experience with at least one new tech tool/toy/gadget/whatever you like to call it.

We have been very lucky to receive funding to buy most of these tools via our curriculum department, but our middle schools won a special grant from our education foundation to purchase our classroom sets of Ozobots!

I thought I'd go over a little bit how we use Ozobots in my 7th grade computer classes. First, I divide the unit up into three sections: on paper / on an iPad / on a Chromebook. Ozobots can do a lot of stuff and be used in different ways, so we start small, on paper, with Ozobot reading lines and color codes, just to learn the basic workings. We look at the sensors and how the robot works. We talk about basic care and maintenance: cleaning the wheels, charging the battery, and calibrating the robot before sending it off to travel.


I'm an almost 100% paperless classroom, so it bothered me that I was having to print out so many calibration sheets on paper (even if I kept and collected them each class, they would get lost or damaged/folded up and I would have to make more), so I found a solution that seems to be working really well so far! I cut out circle stickers from black matte vinyl on my Silhouette Cameo machine at home (I bought one two summers ago for my own personal use and I love it!), and stuck them to the underside of my centerpiece placemats at each student work table. If you don't have placemats to hide stickers under, you could still put a circle sticker on each desktop/tabletop in your room for calibration purposes.

In class, we also talk about line following/line sensing robots and how the technology is being used now/could be used in the future. One of my favorite videos to show is this one involving robot chairs!


Students can choose to work individually or in pairs with Ozobot, since I have 18 devices total. But for the second part of our unit, which is on iPads, we have to get into groups that are a little bit larger, because I only have 9 iPads. It ends up being no more than 4 per device, so not too bad. We use OzoGroove to program our robots to dance! Working in larger groups means using multiple Ozobots with one iPad, which is actually advantageous when using OzoGroove because you can write one dance program, but run it on several Ozobots at one time so they dance synchronized! It's pretty neat.

Out last portion of the Ozobot unit is using our Chromebooks! We use OzoBlockly to solve puzzles (the shape tracer) and to write code (the Editor) to load and run on our Ozobots. If you've ever used Scratch, you'll find that OzoBlockly Editor is very similar in how it functions.

The end of the unit is the most fun for me, because I like to see what students can come up with using their Ozobots. Some set up games, like tiny bowling pins, and others make mazes or race tracks for their Ozobot to run. I've been doing a little bit of exploring via Pinterest as to how other educators and families are using Ozobots, and I found an awesome resource over at Tech Age Kids where they detailed the instructions to build a tiny Lego chariot for Ozobot to pull! I was so excited to find this that I had to try it out right away:


I'm going to give students the opportunity to integrate Ozobots with Lego this term, and I'm excited to see what they do! Every time I teach a unit, it gets a little bit better and I see more and more cool things that students come up with!

- Mrs. L.

Friday, October 7, 2016

Classroom Organization for Technology and Makerspaces


One of my strengths as a teacher is my ability to consider the classroom space and to organize materials, furniture, and equipment for optimal functionality. I like to think that it was an after-effect of my teaching art and having to organize a large studio art space (and the corresponding art materials) for 13 years!

One of my passions as an educator is design for learning spaces and classroom environment. If you watch my YouTube video from the beginning of last year, I give a mini-tour of our classroom space (updated version for this school year coming soon with lots of new stuff!). I give a lot of thought to the aesthetics and functionality of the classroom.


When I first made the move from huge art studio classroom to gutted-out former computer lab (the size of a typical classroom), I knew that there were two very important tasks: I needed to paint the room, and I needed storage space for students' books. 

The tables in my room are small. They have to accommodate four students at a time, so there is absolutely no room for books on the floor or tables. Space is precious! So I utilized a KALLAX IKEA shelving unit as "cubbies" for my middle school students to stash their books, trappers, gym clothes, and chromebook cases during the class period. It's been a life-saver!


Shortly after the school year started, I realized the importance and need for a set of USB mice in the room. Some projects (like our Google Draw Avatars) require some precise fine-motor skills, and an external mouse really helps! After a failed attempt to store mice in a plastic bin in individual plastic sandwich bags, I switched to this shoe-hanger technique that's been wildly successful! Not only are my mice organized and tangle-free, I can easily see if they've all been returned at the end of the period. 


I love this method so much that I purchased two MORE shoe hangers this school year to store microphones, mic stands, digital cameras, and video cameras! I hung the shoe hangers on a closet door to a non-functional closet, so the door is always shut, and now this space is functional again!

My next favorite organizational tool is to use inexpensive bins and boxes:


I purchased these small plastic lidded boxes at the dollar store to hold our Makey Makey devices. Each box holds the Makey Makey "controller" panel, the USB cord, and a handful of alligator clip wires. It's very easy now when we work in stations for each group to just grab a boxed Makey Makey kit and get to work! I printed labels out to number our class kits and used plain old packing tape to stick them on. 


IKEA makes the BEST bins for Legos! They're shallow, which makes them good for digging in, and stackable, which allows for easy storage on a cart or shelves. They have lids! And they're inexpensive, too! These TROFAST bins are $3 each for the boxes, and another $1.50 for each lid. I highly recommend these boxes for at-home Lego storage, too! 


Our Legos are mostly used in conjunction with LittleBits electronic building and inventing blocks, which presented yet another organizational challenge. LittleBits come in nice sturdy cardboard boxes, sectioned off for each bit, but my 8th graders couldn't be bothered to figure out which bit went where, and in a hurry, would stuff them any place that they could. I tried a plastic tackle box, like for organizing jewelry, but that, too, was too fussy. I settled on this system, pictured above, which has worked very well so far. It's two plastic 3-drawer storage units, stacked vertically. I think the drawers are about the size of a sheet of paper? I had to search a few different Target stores to find them, but it was well worth the hunt. I labeled the drawers by bit color/type, and that organization seems simple enough even for students cleaning up in a hurry to handle!


The best organizational investment of this school year has been for a couple of gadgets that allow me to charge several devices at once! This nifty rack, shown above, can handle up to 10 USB charging cables! I have a set of 8 iPad minis that need to be both stored and charged, so this was the perfect solution! Pro tip: splurge for a set of shorty USB/lightning cables to avoid a tangled mess of wires!


Here's another charging adapter that will handle 10 USB cords. It doesn't have the organizational "rack" function for iPads like the first one I showed you, but this multi-charger is used for my Dot and Dash robots, which wouldn't fit an organizer system like that anyways. Before I had a nifty multi-charger like this, I was running multiple power strips along the floor of the classroom in order to get them all charged at once!


My newest organizational tool for the classroom is the perfect complement to our wipe-off surface tabletops: magnetic baskets to hold our wipe-off markers and erasers at each table! I bought wire mesh baskets with small extra-strong magnets on the back. My table legs are metal, so this fix is just what we needed, but you could affix baskets via zip ties, velcro, or hooks if you wanted. I love that now each table has their own set of supplies (as opposed to a communal bin of markers and erasers), and they take up very little space, while still leaving the entire tabletop free!

I hope that you enjoyed some of my organizational tips and can find one or more that will work in your classroom. Maybe these ideas could even help inspire you to come up with your own different organizational solutions!

- Mrs. L.

Wednesday, August 31, 2016

Hack Your Classroom Space: DIY Whiteboard Tables!


My major summer project this year was painting the classroom tabletops with whiteboard wipe-off paint! I thought that it would be a great addition to the classroom because:
  1. It's a novelty - who doesn't like to write on furniture?!
  2. It encourages collaboration - my students work in table groups, so they can easily work together to brainstorm or diagram.
  3. It provides a different kind of hands-on activity - we use our Chromebooks so much in computer class, it's nice to have an "unplugged" activity once in a while!
  4. It addresses multiple intelligence philosophies - visual learners who like to draw or write out notes and ideas by hand get the opportunity to do so. 
I was super lucky to win a grant from our district's education foundation at the end of last year, which will allow for the purchase of "rocker" stools and a set of beanbag chairs for the classroom. I felt like giving the tables a fun face-lift was the perfect complement to the new furniture. Thankfully, I had enough money left over after the furniture purchase that the education foundation was willing to fund the supplies for this project, so long as I was willing to put in the work.

I did a lot of research prior to beginning this project. I used this tutorial for the bulk of my instructions (thanks, Pinterest!). I also read a whole lot of Amazon product reviews to determine the best paint for the job. I learned that it is a good idea to buy your paint in-person (I went to Home Depot) rather than ordering online, as you are able to open the boxes and check the manufacture date... Apparently this paint is good for 2 years from the date of manufacture, and after that, you should not use it. Whether or not this is true, I do not know, but I wasn't going to take a chance!

I bought two of these cans of wipe-off whiteboard paint, and a foam roller/tray set, like this. I also grabbed a couple rolls of blue painter's tape to tape off the edges of the tables. It cost me less than $80 for all of the supplies. Not too bad.

I came in to school the week after students were let out. It took me an entire school day's worth of time to complete this project by myself, but if you had a friend, you could probably knock it out a little faster? In the end, my timing worked out really well because it allowed for adequate dry time between coats, and then the tables had the entire rest of summer to cure before we attempted to write on them!

Here's how the paint works: it comes in two parts, which you mix together before painting on. Once the paint is mixed, you have only an hour or two to apply it before the paint is no longer any good. So there's no saving paint for touch-ups, unfortunately. The plan for now is that I'll probably buy a new can of paint and do a refresher coat at the end of this year to prepare for the next.

I did have the presence of mind to take some photos as I worked, so that you can see the transformation as it happened:


The first thing that I did was give the tabletops a really good clean/wipe down with some disinfecting wipes, and let them dry. Then I began the somewhat time-consuming task of taping off the edges. Depending on what your tables look like, you may or may not choose to do this step. Even though it took me a while, I feel like it was really worth the effort.


The tables in my room have a vinyl/plastic-y rounded edge trim, and I think it would look weird if I painted it. Not to mention, I'm not sure how well the paint would stick. 


I ended up applying 4 coats overall. Coat #1 was not full coverage, so don't panic if you see streaks on your first go-round. I painted all seven tables with coat #1 before moving on to coat #2. By the time I finished table #7, the first table was generally dry enough to start the second coat. 

I also had a box fan running in the room, pointed at the tables as I worked to help speed the drying process between coats.


I ended up using ALL of the first can of paint, and a good majority (but not all) of my second can of paint. I made four rounds/four coats of paint on each table before I called it quits. 

For those interested, my tables are about 30 inches wide, and 60 inches (5 feet) long. 


The foam roller was really important because it helped to create a very smooth, even coat overall, suitable for a writing surface.


Originally, the tabletops were a speckled light gray color. Painting the tops with this glossy wipe-off paint made everything look clean, fresh, and new!


I left my room like this, all summer, so the tabletops could cure properly before we tried writing on them. I did (carefully) peel off the blue tape when I was finished painting at the end of the day. Peeling off paint while paint is still wet seems to be effective for getting cleaner lines. If I peeled it off after the paint was dry, I might end up peeling up some of the tabletop paint along with the tape!

Once our new year began, I was super eager to test out the new tables. While I was setting up the room a few days before school started, I gave my 4-year old son, Iggy, some markers and an eraser to try it out. Success! 

I'm so happy with how these turned out, and I highly recommend "hacking" your own classroom furniture using this method! 

We used our tabletops to do a "complete-the-sentence" activity in 8th grade involving similes. It was easy for students to look across the room and see what their classmates had written, as opposed to being hidden behind a screen. Many students had fun embellishing their responses with drawings and designs:

via Instagram
I did discover some really awesome dry-erasers that work amazingly well with my tabletops. These erasers by 3M have two sides to them: a grippier, scrubby side, and a smooth side. I have found that when using these erasers, students can get a completely clean tabletop at the end of class! Score!

Side note: If you are viewing my blog from within the district, it seems that my former photo hosting site is blocked this school year, so all of my past images are not showing up/have broken/blocked links. Whomp whomp. Sorry about that. I'm working to find a solution to this as soon as possible. 

- Mrs. L.


Thursday, February 4, 2016

Valentine's Maker Projects

I came across a couple of really fun-looking STEM/Makerspace-inspired Valentine's Day projects, and I thought I'd share them with you here:


Light Up Circuit Valentines 

This light up circuit project is very similar to the one I used to teach in 8th grade art last year, but with a Valentine's twist! I think I'm going to make one for Mr. Leban.

LittleBits Love-O-Meter 

We use LittleBits in 8th grade computer lit class, so this idea is pretty humorous to me. It uses an arduino bit, which we don't have, but it gives me an idea for a future assignment: to challenge students to create tiny "arcade" type inventions using LittleBits. Super fun!

Happy Valentine's Day (soon)!

-Mrs. L.